Sunday, October 2, 2011
Netbook Sleeve!
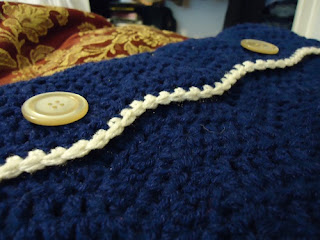
(I had yet to sew on buttons in these pictures! XD)
I was looking for a good sleeve pattern for my netbook (so my keys stop scratching it up in my purse!) and found this. I decided I didn't like it all that much as I tried to make it (I couldn't get the foundation and first rows to work for the life of me, and didn't really like the wonky flap). I looked up chevron stitches, and decided I liked the way a double crochet simple chevron stitch looked way more, anyway, so I went ahead with that and modified the pattern quite a bit.
I made this for a 10.1" Acer Aspire One netbook, but as long as you have an appropriate number of chains in your foundation row, you can make it bigger or smaller. Size it up against your item after you add the first row, though, because the ripples will make the size adjust. Because the chevron stitch requires precise multiples, try different hook sizes for gauge and tightness. My netbook sleeve is a bit loose around my netbook (about 1/2 inch on each side), but since it buttons shut and I might add lining later, I'm not too worried about it.
If you don't know how to dc3tog, I've added it at the bottom. Trying to make sure everything is in one place - let me know if there's something else you need to know, and I'll add it!
For this pattern, you will work a long rectangle that will be folded around your netbook/laptop/whatever with some leftover for a flap to be buttoned down.
I used worsted weight yarn and 5 mm (H) hook. For my netbook, I chained 43. Your chain should be a multiple of 10, +3. As you add rows, all of the valleys and peaks of waves should line up. If they don't, you did something wrong in your foundation row or chained an incorrect number of times.
Foundation Row (the wiggle starts here!): Skip 2 chains, dc into next chain. (1 dc into each of next 3 chains, dc3tog across next 3 chains (valley of wave), 1 dc into each of next 3 chains, 3 dc into next chain (peak of wave)). Repeat () to last chain. Instead of 3 dc, into last chain, work 2 dc. Chain 3, turn.
Row 1-31 (or desired height): 1 dc into very first stitch, (1 dc into each of next 3 stitches, dc3tog (the previous row's valley will be the middle stitch that you are crocheting together, if it isn't, your chevrons will not stack properly), 1 dc into each of the next 3 stitches, 3 dc into next stitch (the 3 dc will occur in the middle stitch of the previous peak)). Repeat () to end of row. Work 2 dc into the top of the turning chain of the previous row (this will take the place of the 3dc into single stitch step). Chain 3, turn.
Row 32 (or 3rd to last row): For button holes! Make button holes on desired chevron peaks. 1 dc into very first stitch, (1 dc into each of the next 3 stitches, dc3tog, 1 dc into each of the next 3 stitches, 3 dc into next stitch). Repeat () until start of desired wave (this will be after the dc3tog step). 1 dc into each of the next 3 stitches, chain 3, skip next stitch (peak of wave!), go back to repeating (). Do this for however many button holes you want.
Row 33: 1 dc into very first stitch (3 dc into next 3 stitches, dc3tog, 3 dc into next 3 stitches, 3 dc into next stitch). Repeat (). Treat the chains just like stitches.
Row 34: Change color if desired for edging on flap. Chain 1, sc across the row. Tie off, weave in ends!
Fit your laptop/netbook (hopefully you were doing this periodically while you were making the thing! XD) and fold your work around it to desired flap height, etc. Safety pin the seams where you want them to hold them in place for sewing.
Do the seam however you want - I did an invisible seam sewn with a tapestry needle in the navy base color. Tutorial here. You can also crochet the seam. I debated crocheting it with the aran edging color I used on the flap, but I didn't really like how it looked when I did it.
Sew on some buttons and you're done!
To dc3tog:
This stitch will create 1 stitch that consists of 3 double crochets stuck together in one stitch. This is the valley of each chevron.
Looks like this!:
YO and pull up a loop through the first stitch, like you're going to make a dc. YO and pull through 2 (leaves 2 loops on hook), YO and pull up a loop through the next stitch (4 loops on hook), YO and pull through 2 (3 loops on hook), YO and pull a loop through the third stitch (5 loops on hook), YO and pull through 2 (4 loops on hook), YO and pull through all 4 remaining loops. Done!
Subscribe to:
Comments (Atom)


